Sanyo - M2440Hx

by bongoplayingmonkey
This is the weirdest build I’ve ever completed (it’s not finished). Why is it weird? Because it’s one of those mythical unicorns that is a project where I knew what I wanted to build, I had a pretty good idea of how I wanted to build it, I did actual pen and paper sketches, the finished build does 90% of what I intended it to do, and it actually looks like my sketches. Big pat on the back for me.
Let’s get all the failings out of the way first, in no particular order -
I still haven’t finished coding the status displays for the little 1602 LCD screen
The analogue VU meter that was almost THE WHOLE REASON for this project
(no joke) still isn’t calibrated.
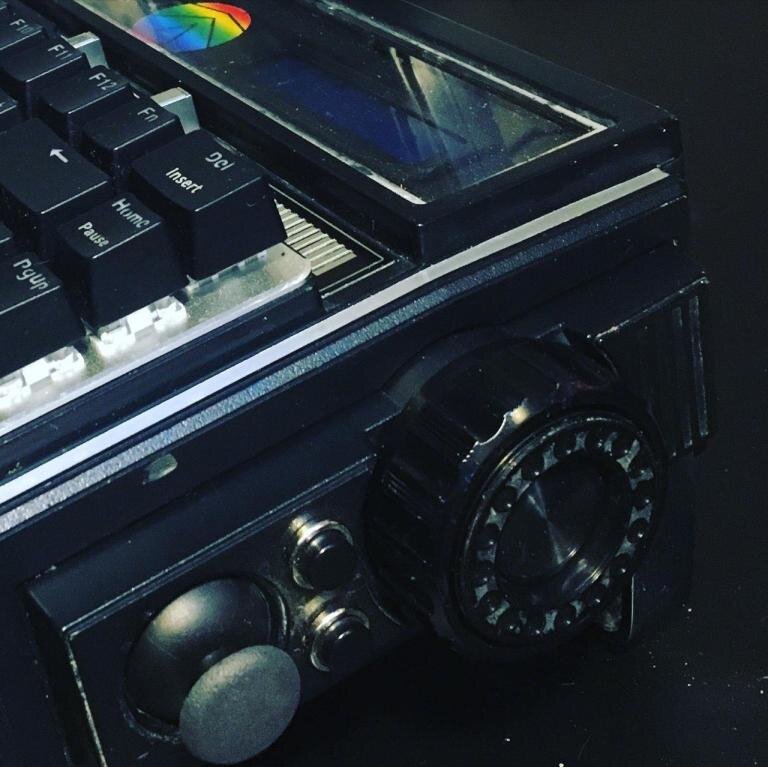
The keyboard scratched the LED display the first time it was folded up.
Thanks to my inconsistent soldering I had to swap out an analogue joystick module.
The replacement stick catches in the housing whereas the original was super smooth.
I want a strap for it.
Two pro-micros, one analogue joystick module, and a power management hat were
harmed in the process.
I accidentally stabbed myself with a 3mm screwdriver whilst removing supports for
the 3D printed screen. Completely through my left index finger. It hurt dear reader.
The inspiration:
I’m old. Like, really old. I was a kid when Neuromancer was published and a teenager in the early 90’s when I read it for the first time. I’ve always felt that the design of sci-fi stuff should naturally flow out of the design of 70s and 80s consumer electronics because that’s what the visual environment was for writers like Gibson. I grew up obsessed by cassette futurism before I knew what it was (I probably only heard of that as a thing in the last couple of years tbh). So I wanted to build a cyberdeck and I decided I’d destroy some piece of vintage electronics in the process. The only real portable technology that was available as a kid in the 80’s/90’s was the radio cassette player. If I could find the right cassette player I’d be guaranteed some of the following perks:
a handle
some chrome trim or knobs
completely weird but beautiful design elements (like a stylised map of the world)
an overall aesthetic that incorporated futurism and industrial but was ultimately cheap and nasty looking too.
Behold, the Sanyo M2440H, a late 70’s radio cassette player! It screamed cyberdeck. An oversized handle. Loads of nasty looking chrome trim. A random map of the world. A huge tuning knob on the side. Made by Sanyo who seemed to be making all the cheap future looking consumer tech when I was a kid. Best of all, slap bang in the centre of the display, an analogue VU meter! I picked up a partially functional one from eBay for £10 and started the teardown before I’d finished unwrapping it.

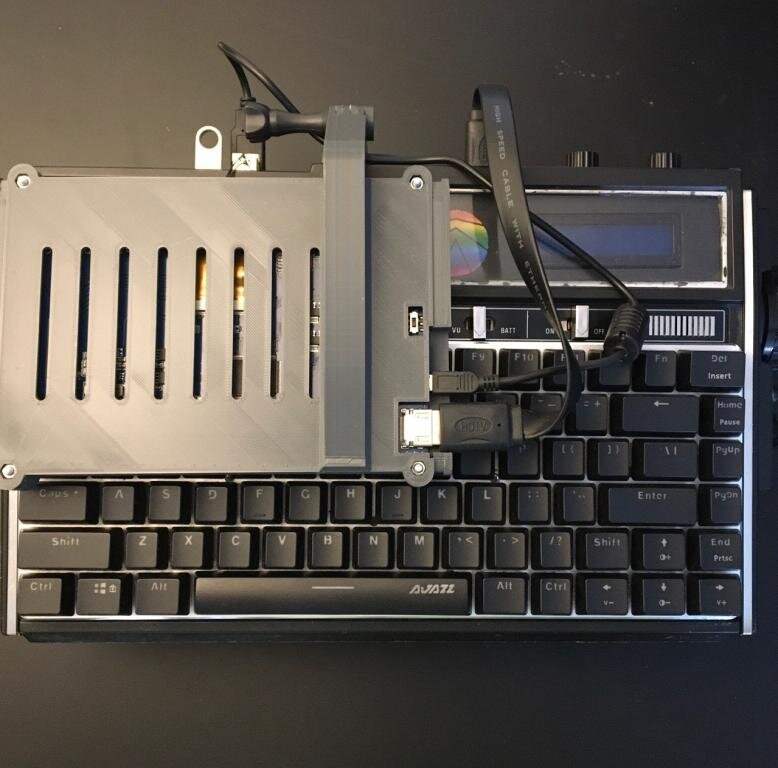
While I’d been waiting for it to arrive I’d sketched out how I was going to transform this into a deck. I was going to firstly and most importantly, keep the VU meter to use as a battery check, and maybe be able to get a visual indication of other operating parameters like wifi signal, or processor usage, or output volume on audio etc etc. I was going to turn the housing with the knobs on the right hand side into a quirky HID using a pro-micro to interpret the data from a PS2 style joystick module, a couple of buttons and a rotary encoder. I was going to cut a hole in the front for a cheap mech keyboard (I ended up using the AJAZZ AK33 as it’s got a shiny metal top plate and it was exactly the right size). I wanted a screen that was small and relatively low spec to fit with the rest of the aesthetic so I settled for an Elecrow 7” monitor, and because it’s the law that cyberdecks have to be built with a small ‘left justified’ display, I planned to make some kind of hinged arm to have it floating over the left hand side of the keyboard. I wanted a Pi4 inside with some kind of battery and management that would give me a few hours portable use.
The build:
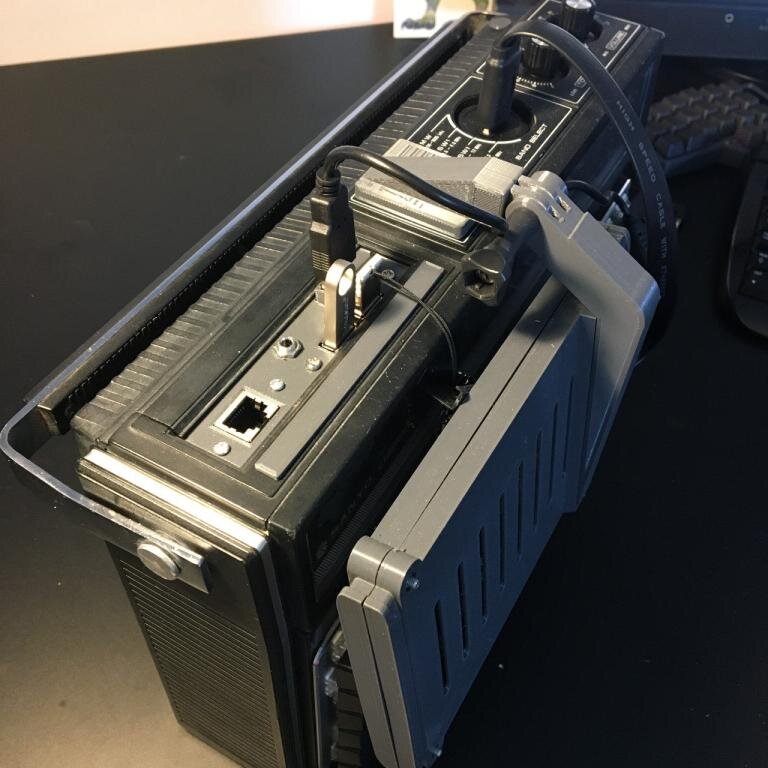
Teardown of any vintage electronics is a heady mix of discovery, confusion, anger, injury and disappointment as the volume of salvageable materials and components dwindles. Luckily, the case, the knobs and buttons, the VU meter and all the trim survived intact. The major problems with retrofitting modern tech into vintage casing is the amount of designing, tweaking and iterating custom mounts and supports for everything that has to go back inside after you’ve eviscerated the case and shattered it’s vintage ABS bones. I think under the circumstances I’ve done some of my best ad-hoc 3D design work to date, getting components to hang securely inside the case, but the wiring is chaotic and there’s a lot of dead space for something so chonky.
I am really pleased with the design of the HID on the side for two reasons. As crappy as my coding is, I successfully cut and pasted a load of other people’s work into a useable bit of code to give me full mouse controls. The giant knob is a centre click and scroll wheel, which ergonomically is amazing for reading text. The mouse buttons were vintage momentary switches from eBay and I think are real chrome and bakelite. The first iteration of the HID was truly great. It broke because I had to desolder the pin header on the module to get it to fit the case and I totally cooked the pads doing this. The module I got to replace it was similar but the dimensions were just off enough to make it sticky. I hope it gets better with use.

The 3D printed case for the display was adapted from a pretty bland enclosure on thingiverse. I only needed one iteration of the design. I added some detail to the sides to match the profile of the main case and at some point I intend adding some chrome strip in there to match the case. Given that it’s just PLA It’s pretty robust and the display has been in it’s open position on my desk for a few weeks without any sign of moving or sagging.
The power pack was where I made one costly error. I bought a PiSugar 2 Pro to handle the power management and this proved to be a mistake due to the fact I couldn’t mount the pi anywhere where the reset switch for the PiSugar could be reached. (After cycling power it seems you always need to reset the board) I had to swap this out for a Geekworm x708 which proved to be a brilliant choice because it allowed me to mount the pi where I now have access to the GPIO pins through a removable vent panel in the rear of the case. All the ports are on short leads to panel mount sockets. For the moment I am using the battery that came with the PiSugar but I’ll probably switch to something else when we can buy batteries again. I think at the moment I probably only get an hour or so on battery (maybe adding random LEDs and an LCD1602 for bling was a mistake?) The only downside of the x708 is that I have to remember to send a shutdown command to the x708 otherwise it carries on running after shutdown and drains the battery.
Verdict:
I did what I set out to do. I built something that’s got a cassette futurism vibe, it mostly functions and given that from the outset I jokingly described this as 90% art 10% functionality, I’m pretty happy. On the other hand, I critically think I went too retro on this and it suffers from the usual problems with cyberdeck builds - the now cliched small asymmetrically mounted screen, and not using a VR headset. Next time, because there always is, I’m going to put more effort into designing for functionality. I still have retro tech I want to abuse, but I want to make things that are also fun to use as well as good looking. My jury is out on whether this deck is more purgatorial than it is divine.
