TRL 2/21/21
What have I done?
I have made myself a fully functioning computer. Small, unusual, impractical, thick and heavy. I could have probably spent all the money on a decent modern device, but where's the fun in that? By fun I mean learning new things! Lots of them!
HOSAKA Cyberspace VII MK3 by TRL
The vision
My passion for making, technology, awkward computers, space exploration and cyberpunk manifested in my dream computer. Design cues from Apollo 11 control panels, artificial materials (because even wood was rare and precious in the Blade Runner world), modularity and "aftermarket" add-ons, which contradict today's trend of uniform thin aluminum or plastic slabs. It should be wearable, tool of the trade, with a patina of use. Like a beaten 10-year old Thinkpad with scratched black coating and metal showing below. And it must be usable, not just a prop for a couple of reddit photos.
Cyberspace MK1, MK2
The path to success is rarely straight. There have been two attempts which both failed the basic requirement: usability. There has been the slab MK1: slide on, stack-up for transport. But it had the stock Raspberry TFT, which is hard to use daily, especially if you need to use the browser time to time.
Then there was MK2 in the laptop-ish for factor. Bigger screen, hot-swap battery, integrated pHAT expander (oh how I love pHATs). Could have been good, but the screen was very heavy and I didn't get the hinge right. It held upright, but it was very easy to slam the screen against the keyboard. And the whole thing was chonky and I don't like chonky.
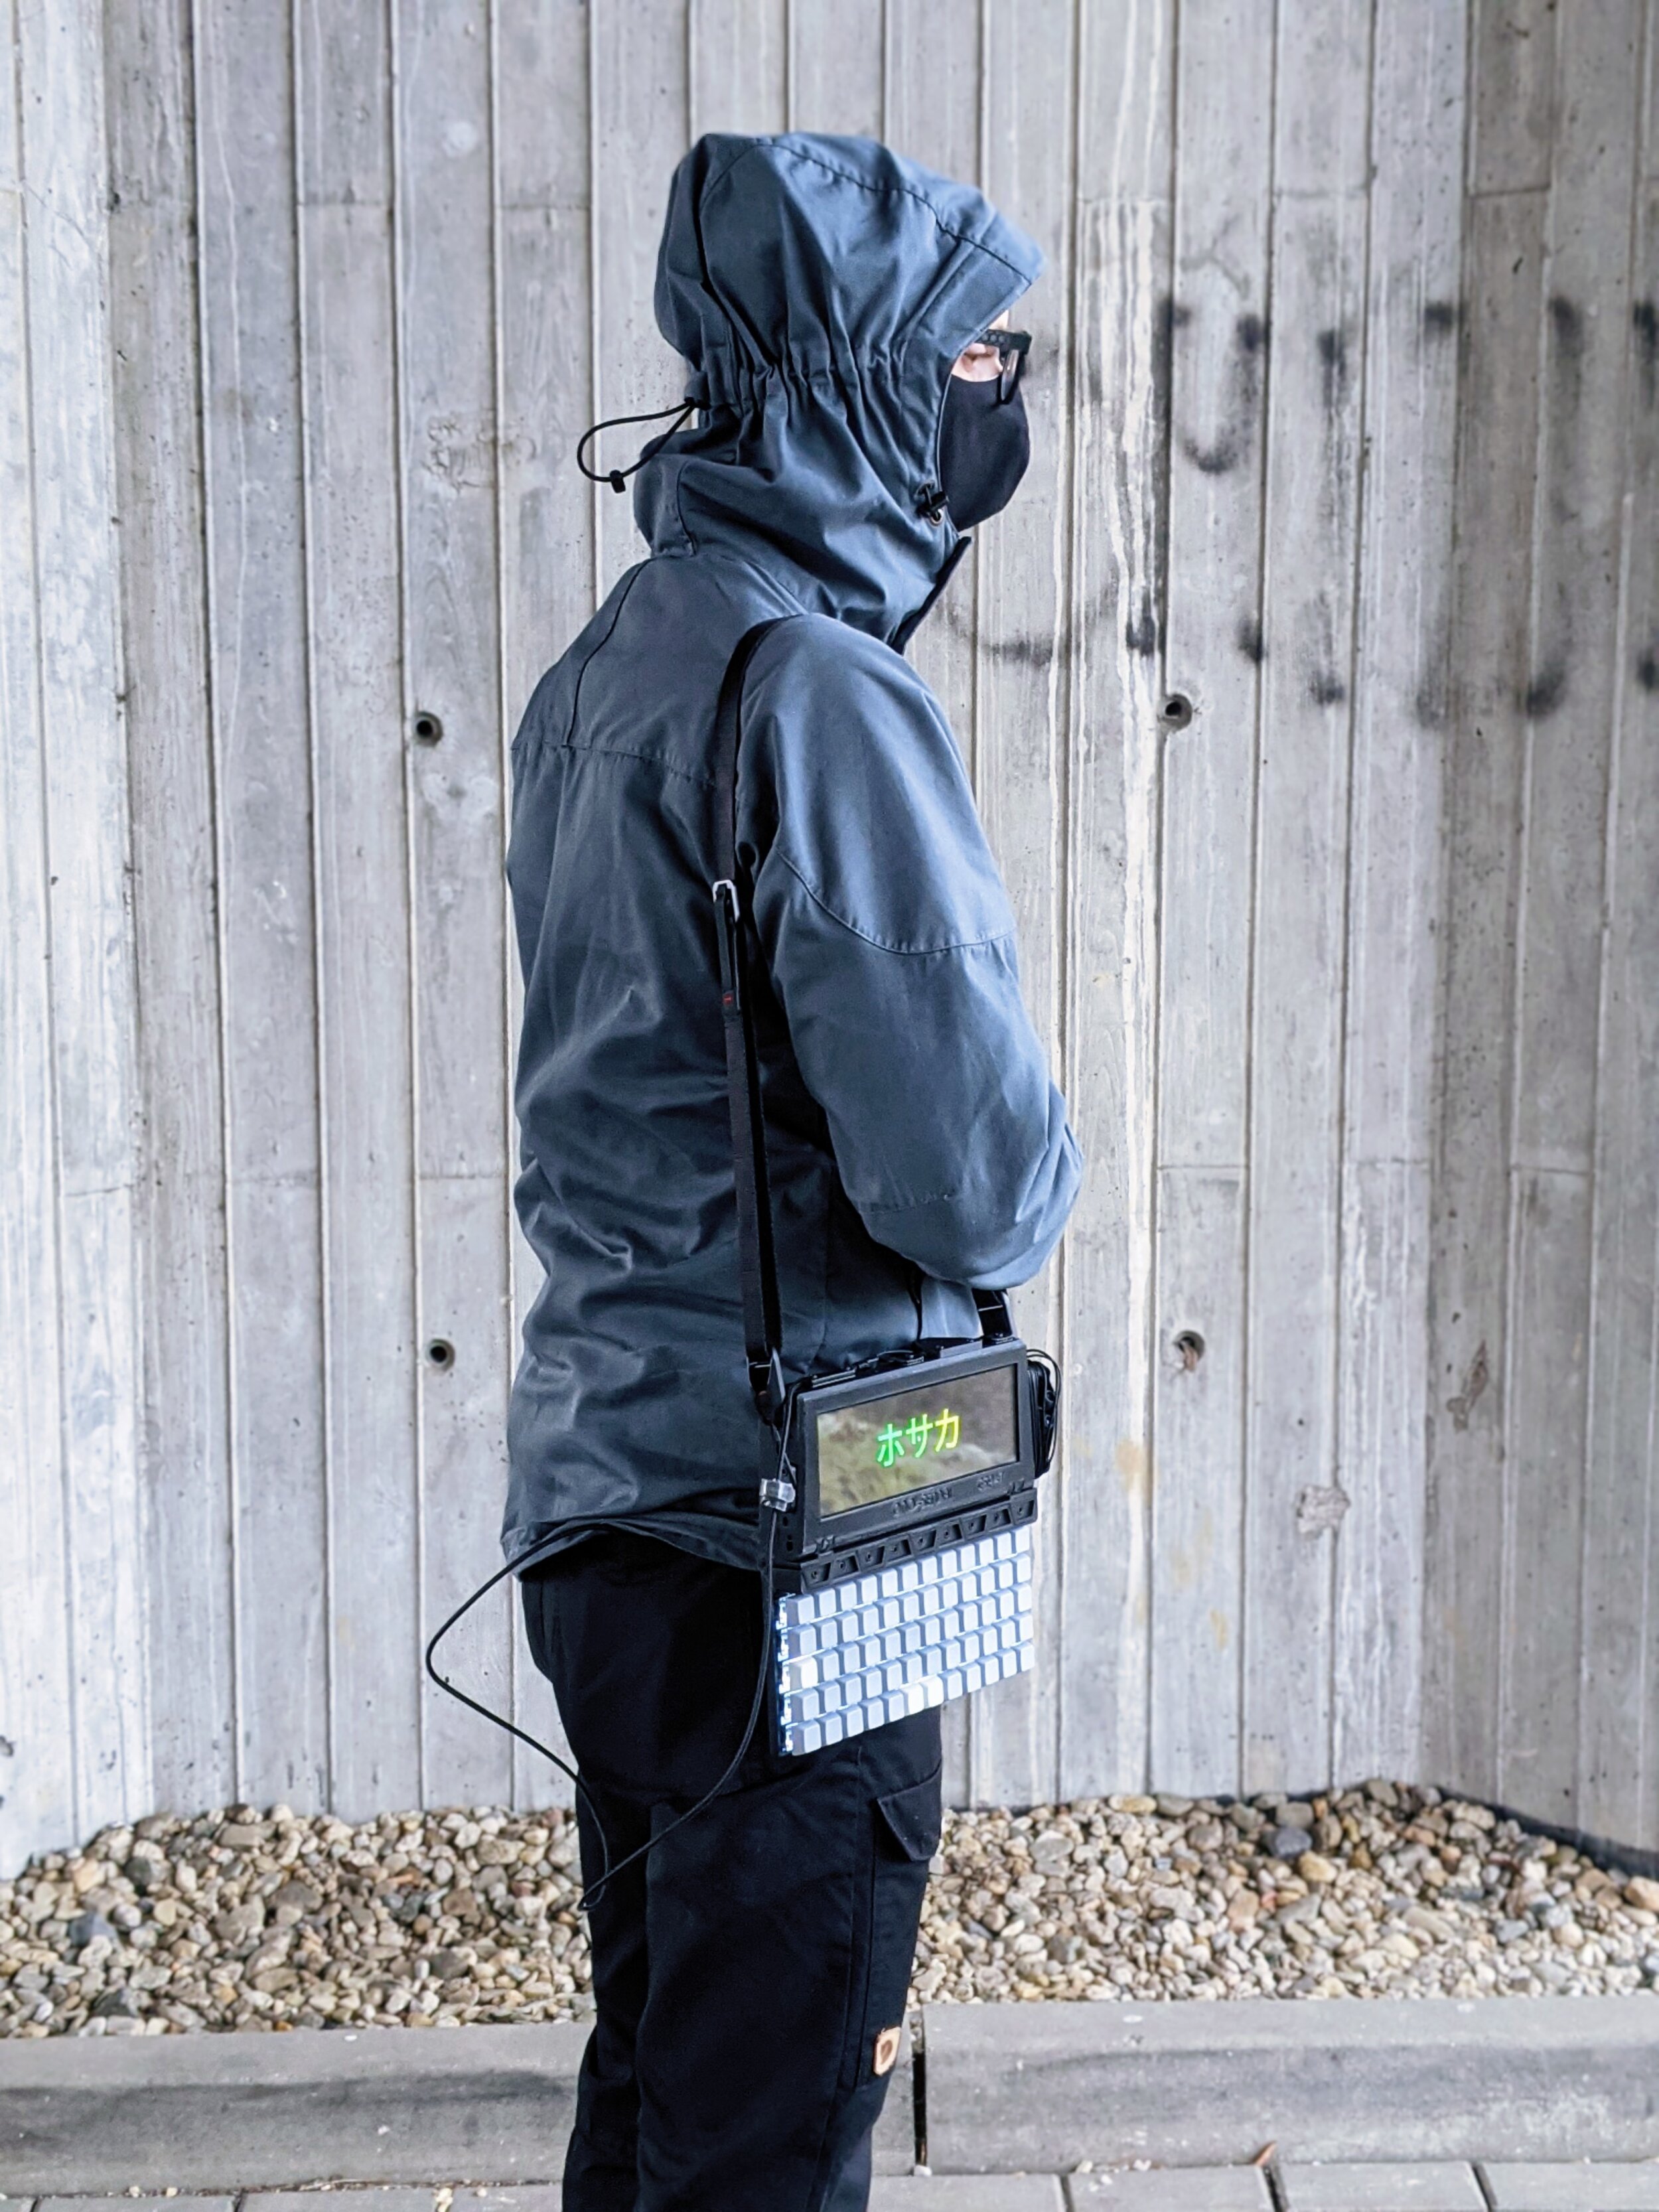
Ono-Sendai Cyberspace 7 MK3
Disclaimer: this is not cyberdeck per se - it has a screen, not a VR rig as an interface.
The Hosaka brain is every maker's favorite Raspberry Pi 4 with 4 GB of RAM. I don't need more. I have a normal decently powered computer to connect to, should the need arise.
The interesting thing is the screen. I knew I had to build a portable compuer around it the moment I saw it: Waveshare 1280x400, capacitive touch screen. Designed to have a Raspberry attached directly at the back with connectors for power, touch and image. Surprisingly the height is not an issue for terminal work and is also quite usable for browsing at 80% zoom.
The keyboard is a cheap ortholinear from Aliexpress. JJ50 with Gateron switches and blank keycaps. It was quite fast to get used to it, I was surprised how usable ortholinears are. Also the fifth row with numbers helps a lot.
The power
After wrestling with PiSupply's PiJuice and trying to keep it cool with passive-cooled RPi4 (the battery itself reached 50+ C), I have temporarily ditched the idea of integrated battery power and went the easy route - power bank on a cable. 10 Ah keep it up for 5 hours. I have two of those and a 20Ah one; in case of emergency I can run for 20 hours on the power I already have. For the future it would be nice to have 120-second supercap UPS to be able to hotswap the batteries.

HOSAKA Cyberspace VII MK3 by TRL
The body
After gaining experience with MK1 and MK2, I knew the MK3 had to be modular. There are three parts: the keyboard, the backplate and the screen part. All held togerther with M3 and M2.5 screws. Printed in silver PLA with a coat of matte black paint. Afterwards, I have weathered it with a couple hits on the exposed edges.
The body is completely 3D printed, mostly in PLA. For your reference there are 3 bottom layers, 3 top layers, 3 perimeters and 20% gyroid infill.
It has a slate/slab desing with tilting screen, just like old electronic word processors. It can also quite comfortably be used closed and also on the strap around your neck.
On the heaviest part - the screen - there are mounting points for accessories. On both sides there are anchors for the black removable strap by Peak Design, cable fasteners to protect the Pi's connectors for power and headphones and a simple hook to keep the whole thing closed.
I'm very proud of the interlocking mount, which takes inspiration from Apollo 11 command module, but was adjusted for 3D printing and would be hard to machine any standard way.
Stickers are from my labeler, I've used different lousy fonts and asymmetrical placing to mimic labelling in a prototype workshop. I've also thought of putting a half of "Warranty void if broken" seal on the bottom, but that does not make sense on a one-off piece.
The compromises
Obviously the platform and power. No matter how cool it is, it is a sidekick to my main computer. I'm not a dev, who can earn for their living in command line. For work I need a fast Windows machine with full MS Office suite, Teams conference calls (it has a web version, but it loads more than a minute and is total pain to use on the Pi) and be able to run presentations. But suprisingly a lot can be done through Windows remote desktop and I also run a x86 distribution in VirtualBox on my main computer and use SSH, mosh, browsh and X forwarding to overcome power limitations of the Pi platform.
How do I use the deck

HOSAKA Cyberspace VII MK3 by TRL
When browsing r/cyberdeck and the deckers' discord, I am always curious about how people use their decks. Why do they build them, what do they miss on the market? Mine is for light use, education in 3D modelling, using Linux and also a distraction-free device. It even doesn't have speakers! Most social media sites are loading slow and are hard to use, youtube playback can tax the processor a lot so that is also very rare use.
I am using my deck as a terminal in the broad meaning of the word. On such a small and portable device the screen estate is precious, that's why I have chosen i3 as my window manager. The i3bar is set to autohide to gain even more precious pixels.
I have my computers, NAS and other devices connected into one virtual network through Zerotier for an always interconnected network. This way I can use SSH (or more often mosh) to connect to other devices, transfer files, initiate torrent downloads and work no matter where I am.
Locally on the device I have a working Prusa slicer, OpenSCAD for basic modelling and Chromium and Firefox with Lastpass and Dark Reader extensions for convenient use of the web.
Remotely I connect to my big box, even browsing through X forwarding over SSH is faster and less data demanding this way (in case of decent LTE connection). Else there is mosh and browsh to save the day. Also RDP to Windows is a very strong tool. On a reasonable connection it managed even a turn-based game :)
The bag

A local bag maker made me a carrying case according to my design, there is an old bike tube on the sides for durability. No leather, right? It uses the deck’s strap and has a small pocket for external battery and a mouse. There is Molle webbing on the front for more pockets should I need them.
Lessons learned and many thanks to...
Many thanks to many people, especially the ones in Cyberdeck discord, r/cyberdeck, Josef Prusa and the team at Prusa printers for those great tools.
During the year I have learned a bit how to use Fusion360 and how to design in iterations. Idea - 3D sketch - partial print - fitting test - change - repeat. I have also learned that starting with a little and evolving your project on the way is a good thing. Don't dwell too long in ideas, on a quest for perfect device. Visualize what it should do and start making with what you have (some time ago I read developer stories on Google Glass - from idea to prototype in just a couple of days!).
Also making the deck modular (discrete pieces held together with screws) saved kilos of filament and countless hours of printing time. Also get familiar with your slicer settings for quick and cheap test prints. 1 bottom layer, 10% gyroid infill, 2 perimeters and 0 top layers in 0.3 layer height make a quick outcome even with a 0.4 mm nozzle. Another take on the modularity are mounting holes around the screen. This allows me to add more features without reprinting the whole screen.
Hinges are a big topic in 3D printing. I generally prefer fit by friction and a good inspiration is the GoPro mount. Scale it bigger for easier printing, maybe add more fins for stronger fit, orient it the right way on the printbed and you're done.
What's next
The art of knowing when to stop is not my strenght. It feels like this deck will never be done and the modular design helps it.
One thing that definitely needs improvement is the keyboard. Being my first mechanical keyboard, I have bought very light switches. This makes typing complicated, because it is easy to press more keys at once. So either I change the springs or switches. Even spring switch would mean desoldering of backlight LEDs, but still better than desoldering all switches.
Another not-so-good feature is the screen hinge. Very light, could be tighter.
And power...Having an integrated battery for 4 hours of use, ideally with passthrough charging would be great.
So...not finished, right?